ClickPOS offers an integrated EFTPOS merchant solution for your Point of sale.
The merchant banking offers cutting edge technology by using the internet gateway to process
Credit Cards, Debit cards, even gift cards and for the mobile phone industry recharge cards.
The instructions below guide you on how to install the web bases EFTPOS.
Setup Store PC and Internet Explorer
Setup internet Explorer
Download and install internet security resolution, adds ClickPOS as a trusted site.
Setup Store PC
Installing the Epson printer
You must install the Epson printer prior to installing the EFTPOS terminal.
If you already have the Epson printer installed you may skip this section
Install Epson T88 Series Printers
Installing the EFTPOS terminal
The EFTPOS solution is provided by DPS "Direct Payment Solutions"
Once you receive your hardware as stated below, please download the software and install onto the PC that will use the EFTPOS terminal.
Package content.
Verifone Package Includes :
1 x DPS Software
1 x PIN PAD
1 x USB to Serial Adapter
1 x USB lead
1 x Serial Adapter w/ DC attachment
1 x Power lead
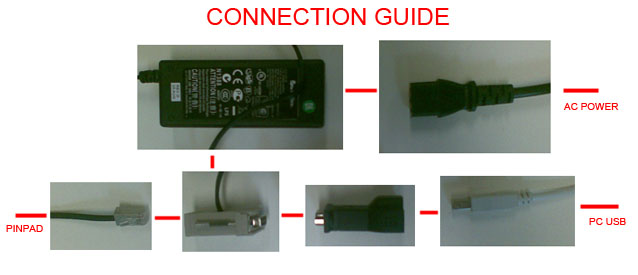
Connecting the cables (Verifone)
Follow connection diagram below.
DPS Install Package
1. Click relevant link below to download installation package.
Verifone
Ingenico
2. Save the file to your PC.
Then Run the file.

3. Installing - Please note:
XP users must be logged into windows as an administrator to install DPS.
Vista user must right click on the downloaded file and choose “Run as Administrator”
4. After downloading the installer, close all running programs and then execute the file.
Selecting "RUN"
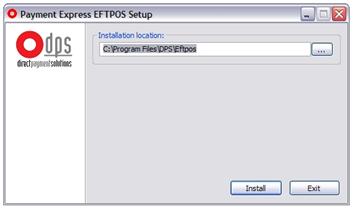
5. Verify the Install location is correct, continue by selecting install.
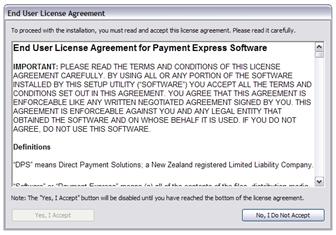
6. You will have to read & agree to the terms & conditions,
"Yes, I agree" will appear when you scroll to the bottom.
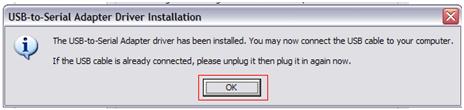
7. You are now required to plug in the DPS USB to Serial Adaptor,
If already plugged in, unplug it then plug it back in again. (please refer to connection guide)
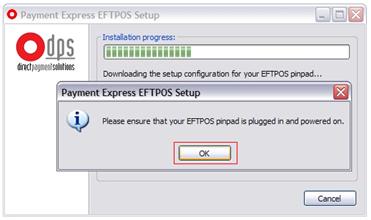
8. It will prompt you to plug in the EFTPOS Pinpad if you have not done so already.
After plugging in or if already plugged in, Continue by hitting OK.
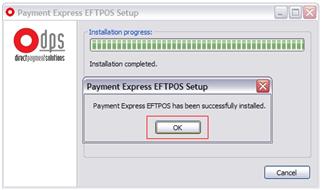
9. Complete.
You may now restart your computer to ensure all changes take effect
Adding a new pay type in ClickPOS
Now you can configure ClickPOS.
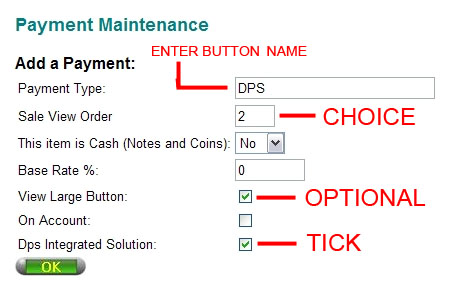
You are required to create a new Payment Type and nominate the tender type as the EFTPOS terminal
In the following example we have used the "DPS" as the payment type.
1. Login to ClickPOS,
2. Go to MAINTAIN | SYSTEM ADMIN | PAYMENT TYPE
3. In the Add a Payment section fill in details as per below diagram
Please note: Payment Type (name) can be anything you like we called it DPS.
DPS Integrated solution must be ticked.
For more on how to add a Payment type, please view the video tutorial.
| Payment Types and Methods |
 |
 |
You are now ready to use your DPS unit!
PLEASE NOTE
DPS questions not relating to Clickpos must be directed to
DPS Direct as they support their own system.
Which Includes Installation, General Faults and Billing Issues
DPS Support : Direct Payment Solutions
Click the above link to be directed to DPS Support.