|
The following information will guide you through the implementation process of ClickPOS.
The document includes Links and Video tutorials supported by PDF files. We recommend you view all video tutorials.
At any stage if you require assistance please contact via email help@clickpos.com stating the issue,
your company name and your contact details.
As the system administrator, you are required to follow the instructions set out below.
Please choose the areas that may be necessary to your business process.
To access the system you need to first setup your Microsoft Internet Explorer,
click the link below for instructions and downloads.
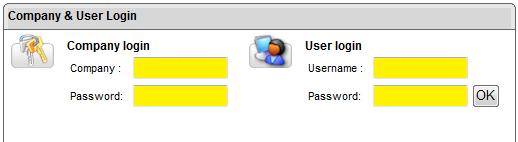
Now you are ready to access ClickPOS using your own login. To login, go to the following website.
You will see the following login page.
Enter the usernames and passwords then click OK to login.
Please note that all staff within the company will use the Company Login and password, but the User login is unique to each employee.
|
|
Initial Company Setup for retailers operating mobile phone outlets
|
Checklist
Use the checklist below to organise the implementation process.
You are required to email this checklist to help@clickpos.com so we can organise and guide you through the process of implementation.
|
Task
|
Department
|
Task assigned to
|
Scheduled start date
|
Completion date
|
|
A Go Live date has been established. This means a stock take the day prior.
|
Administrator
|
|
|
|
|
Notify your staff. All staff have viewed the relevant video tutorials and have confirmed sound understanding of their part in using ClickPOS
|
Administrator
|
|
|
|
|
Build product catalogue
|
Stock Control
|
|
|
|
|
Build Tariff Plan - Carrier, Phone and Plan details - Specific to mobile phone industry
|
Stock/Financial Control
|
|
|
|
|
Financial integration to MYOB or Quickbooks.
|
Financial controller
|
|
|
|
|
The stores have PC's with Internet connection
|
Administrator
|
|
|
|
|
The store PC's are ready with POS hardware. Including scanners, docket printer, cashdrawer, EFTPOS terminals
|
Administrator
|
|
|
|
|
All users have been added and assigned the User group permissions
|
Administrator
|
|
|
|
|
Forwarded employee login details to all staff
|
Administrator
|
|
|
|
|
The employees have tested their logins.
|
All staff
|
|
|
|
|
Stocktake in each store
|
Stock Control
|
|
|
|
|
Enter quantities of stock into system
|
Stock Control
|
|
|
|
|
Items not in catalogue to be added
|
Stock Control
|
|
|
|
|
Start making sales
|
All staff
|
|
|
|
We recommend you copy the following links and immediately email to company employees
advising of the new management system and recommend that they view the video training tutorials.
Now you are ready to build background information into ClickPOS to get it ready for implementation.
First thing you should do is add the user names of staff that will help you to build the background information.
These people include Stock control staff, Financial controller, and other Administrators.
|
Stock Control Administrator
|
The Stock control administrator should now have their login and can access the system.
As a stock control officer you need to build the list of all products or services the company provides.
This section requires you to scan each type of product, enter the name of the product, purchase and sale price details.
Please note that this stage does not require stocktake as we will not enter stock quantities,
however you need to build all the details into the catalogue ready for stocktake.
Please view the following video tutorials then start building product catalogue.
Recommendation:
You need a barcode scanner.
Before you start entering please consider if you will be using the manufacturers barcode on the product or create your own barcodes.
If you are using the manufacturer barcodes already on the products,
then we recommend you have the barcode scanner so you can scan each item into the system.
Which store should we start with?
It is advisable to choose the largest store. By choosing a large store, you can guarantee to include majority of the products into the catalogue. All other stores will share the product catalogue.
|
|
Tariff Plan - Telecommunications Industry only.
|
This section is designed purely for the cellular telecommunications industry. If you do not deal with cellular industry then skip this step.
The following deals with adding, handsets, plans and carrier information.
You require details on
- All handset names, purchase price,
- All plan names, length of contract in months, Carriers they belong to
- Revenue commission from all carriers, and recent commission statement from carrier.
ClickPOS use Flow software to communicate data from ClickPOS to your financial system such as MYOB or QuickBooks.
You are required to install Flow software onto the computer where the Financial systems database is located.
The integration also requires you to have a person who has a sound understanding of accounting and the financial system you have chosen.
As we do not support financial packages or support how they integrate, we advise you take your time and ensure it’s done correctly.
Assigning Accounts in ClickPOS
The following video tutorials explain the item accounts required to be added to ClickPOS.
In the tutorials the field refers to "Account Reference"
Retail store PC setup
Configuring Store Computers and Testing Internet Access needs to be performed prior in each of our stores.
Please review relevant documents and download and install as instructed.
|
|
Getting ready to go live!
|
Now we are ready to add the Store employee details and assign user groups.
By default we have added several User Groups you can use such as Store Sales Reps, Store Managers and Administrators.
You are required to make a decision on the type of login users will use. We recommend all staff should have a Unique login.
Now we are ready to go live. You need to perform stocktake in each store. Once stocktake is complete, add all item quantities into the system, then we are ready to start making sales.
The timing for the next steps is critical. Please make sure that you start using the system as soon as stocktake is completed. The time between stocktake and first sales must be synchronised, otherwise if you leave too many days in between stocktake and sale, the stock variance will be greater.
So here is a list of prerequisites before you can perform stock take.
1. You have product catalogue built
2. All users have been added and assigned the User group permissions
3. All staff have viewed the relevant video tutorials and have confirmed a sound understanding of their part in using ClickPOS.
4. The stores have PC's with Internet connection
5. The stores PC's are ready with POS hardware. Including scanners, receipt printer, cashdrawer, EFTPOS terminals
6. The employees have tested their logins.
7. A Go Live date has been established. This means a stock take the day prior.
If you have ticked all the above, then you may proceed to perform stocktake for one or all stores at a given time.
The final stages include
8. Stocktake in each store
9. Enter quantities of stock into system
10. Start making sales
|
|
Perform Stocktake in each store.
|
Before each store can begin using the system, each store must perform manual stock-take. Stock take can be performed in two ways.
If you are using the "Centralised Stock Control" A nominated person from head office can visit each store, and count stock. Then enter all details into system or
If you are using the "Stock Control by Individual Stores" method then, a manager from each store will do the stock count, then enter all stock into system.
To perform the stock count we suggest you produce the Product Type Barcode List 5-2 report.
This report contains a list of all products you entered into catalogue.
Reports | Maintenance | Product Type Barcode List 5-2.
The report is used for writing the quantity alongside each item.
Then, once stock take is finalised, use the barcodes on the report to scan the items into the system, specifying quantity for each item.
A sample "Product Type Barcode List 5-2" report

Note: If you cannot see the barcode as appears under the heading "Actual Barcode", then you have not downloaded barcode font as specified under Step 4.
Click here to download Barcode Font
Note : If there are products on your shelves that are not listed in 5-2 report, then take down the details. Including : Product description, Supplier, Price and Barcode of the product, and report to your stock control officer to add this item to master product catalogue.
|
|
Add stock quantities into system.
|
Once stock take is complete, you’re required to then enter details into ClickPOS.
Use report Product Type Barcode List 5-2, to enter stock into ClickPOS.
At this stage you can use your barcode scanner to scan the barcode of each product listed under "Actual Barcode" heading within the report then specify quantity.
NOTE: You must be logged into the branch you are adding stock to.
You have two options to add stock.
1. Using the Purchase Orders, the recommended way OR
2. Add stock straight into system.
1. Using the Purchase Orders. This process involves creating a purchase order as if all products are being ordered for the first time.
OR
2. Add stock straight into system
Add stock by scanning the barcode then entering quantity and a supplier invoice number.
The supplier invoice number can be E.g.OS-12012009 , meaning "Opening Stock and the date".
Once all products have been added to stock, you can then check to see your stock list.
Reports | Stock | Product List 2-1 and Phone List 2.2
All stores are operational and can now start making sales.
Daily operation
As an administrator, you need to keep a close eye on all facets of the system.
The most important areas are to check that all sales are going through and banking matches the system.
To see the daily transactions, go to
Reports | Sales | Daily Activity (1-1) report
|