|
Portable Scanner
Use portable hand held scanner to perform remote stock take then import the data from the terminal straight into your computer.
Installation of Handheld Scanner
To Receive files from the Portable scanner you must first download and install the software which allows you to RECEIVE FILES from scanner to your PC.
Note: Depending on your requirements, you must decide if you are going to:
- use PC at each store to RECEIVE the stock take file,
OR
- once stock take is complete in one store, to take the handheld scanner to head office, then RECEIVE files to a PC at Head Office.
Remember that, you must stock take one store at a time. Then RECEIVE the FILE into a PC, then Delete the contents of stock take out of scanner, then you may stock take another store.
So the download below should be performed only on those PC's that will be used to import the data.
We recommend you install this software, into each store's PC. Each time you perform stock take, you simply plug the scanner cradle to the PC, upload the file, then delete the content of scanner, so you are ready to stock take another store.
Click here to Download (SU-PT40-PPG.ZIP, File Size 15,195kb)
1. Save the file to your PC
2. Open the zip file
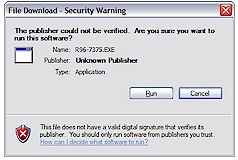
3. Click Run
4. Follow through the defaults.
5. Once installation is complete, click Start | Programs | Xfer32
The following screen will be displayed
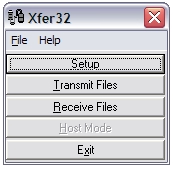
6. Click "Setup" then change the settings
Select appropriate Connection (Com 1, 2 or 3), which ever is applicable.
7. Change the Protocol to "ACK/NAK"
8. Click "OK" to save
You have successfully installed the program to "Receive Files" from the Portable Terminal.
Stock take using the FALCON PT40
Now to perform stock take, Simply switch the on button (Green button)
The following screen will be displayed
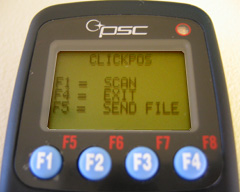
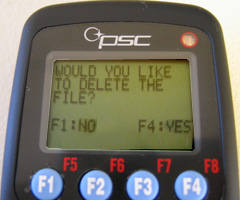
To start scanning we recommend you first Delete the content of the scanner
To Delete content, click SH (Shift), then F5, then F4
Start Scanning
To start scanning, click F1
You have 2 ways of entering barcodes into the system,
1 - Scan the barcode of the product by pressing the "SCAN" button. Scan each item one after another until ALL ITEMS are complete.
2 - If you cannot scan damaged barcodes, manually type in the barcode then press the "ENT" Enter button.
NOTE : You must scan ALL BARCODES into the system.
You CANNOT specify quantity. That is, if you have 10 items of the same type, you must scan 10 times.
Stock Take is complete,
Now to upload the stock take information to the PC
Once stock take is complete, you can upload the file onto you pc.
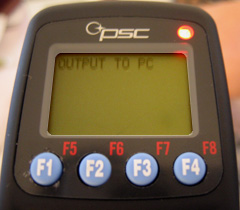
To upload, click any of the Function keys to go back to main menu. eg F4
The following screen will be displayed
Now start the Xfer32 program to receive the file.
click Start | Programs | Xfer32
The following screen will be displayed
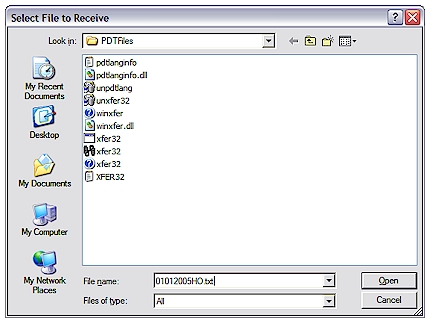
Click the "RECEIVE FILES", then assign a name in this example "01012005HO.txt"
It may be in your interest to create a folder to hold all the stock take data.
Now click "Open"
System will display following screen. It is now waiting the file to be sent through the portable scanner.
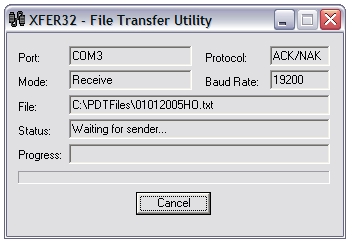
On your portable scanner, click SH (Shift), then F5 to send the file
System will display
Your PC will display file being uploaded.
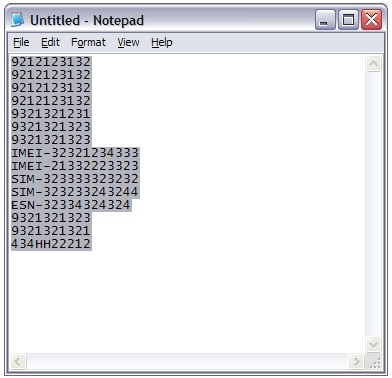
You should now check the content of the file to see if file does have all the barcodes as per stock take.
Open the file "01012005HO.txt" using Windows explorer.
If all is OK, then Copy the file content
Use "Ctrl + A" on your keyboard or Highlight all then right click your mouse then click "Copy"
Now you can login to the ClickPOS system to paste the stock take list.
Please view the Stock Take training module for further instructions.
NOTE : You must login to branch where stock take is being performed.
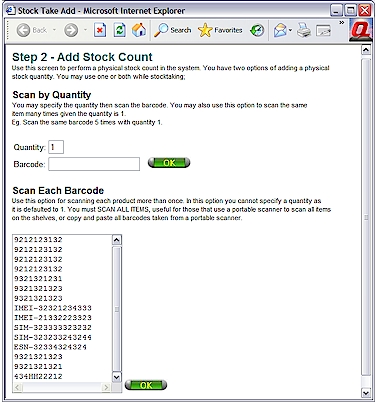
Now paste the information into box provided as per below, then click OK.
|